
By The Panelmart Engineering Team | Fact-Checked & Updated: May 2026

If your walk-in cooler box still cools but the inside is falling apart, you don’t need a full replacement. A practical interior renovation uses FRP wall panels plus a rigid PVC sanitary cove base at the floor-to-wall juncture to satisfy FDA Food Code 6-201.13. The job typically wraps in a single workday and costs a fraction of resurfacing or replacement.

You opened the cooler this morning and the inspector wrote you up. Again. The rubber baseboard is curling away from the wall. There’s a black streak of mold along the silicone joint at the floor. The corner is cracked. The deadline on the violation notice is short, and the kitchen contractor you called wants thousands of dollars to “redo the whole thing.”

Here’s the thing: you probably don’t need to redo the whole thing. If your cooler still holds temperature, if the door seals close, and if the refrigeration unit isn’t on its last legs, the box is fine. What’s failing is the surface inside — and surface failures have a much simpler fix than full replacement. Therefore, this guide walks you through that fix step by step, with honest answers about what works, what fails, and what the inspector will actually check.

How Do You Know If Your Walk-In Cooler Just Needs a Refresh?

Before you spend a dollar, take five minutes to make this call. The decision tree is simpler than most people think.

Walk around the outside of the cooler first. Look at the panels for sagging, soft spots, or visible damage. Open the door and check the gasket — if it’s torn or hardened, that’s a separate fix but doesn’t change the renovation question. Listen to the refrigeration unit. If it’s cycling normally and your monthly electric bill is steady, the mechanical side is healthy.

Now step inside. What you’re looking for here is the difference between cosmetic damage and structural damage. Peeling baseboards, mold along silicone seams, scratched or stained FRP panels, and cracked floor-to-wall junctures are all cosmetic. They look bad and they fail inspection — but they don’t mean the cooler itself is dying. As a result, you can renovate the interior without touching the insulated panels behind it.

What’s not cosmetic: panels that feel soft when you press them (water damage inside the insulation), visible rust on metal skins, large gaps where panels meet, or temperature drift even after the unit cycles. If you see any of those, you’re past renovation territory and into replacement.

Most small operators we hear from are clearly in the renovation camp. The cooler still works. The interior looks awful. The inspector wants it fixed. That’s the scenario this guide is built for.

Why FRP Walls and Rigid PVC Cove Base Are the Right Pair

FRP — fiber-reinforced plastic — has been the standard interior wall surface for walk-in coolers for decades. There’s a reason. It’s smooth, it’s non-porous, it doesn’t absorb water, and it stands up to bleach and sanitizer washdowns without yellowing. Furthermore, FRP panels install over your existing wall surface with adhesive and a few mechanical fasteners, so you’re not tearing anything out.

FRP solves the wall problem. It does not, however, solve the floor-to-wall problem.

This is where most renovations quietly fail. The installer brings the FRP down to the floor, runs a thick bead of silicone along the bottom edge, and calls it done. The cooler looks great for the first inspection. Six months later, the silicone shrinks, cracks, and turns black. Mold gets behind it. The juncture is no longer sealed. The next inspection finds it. You’re back to square one.

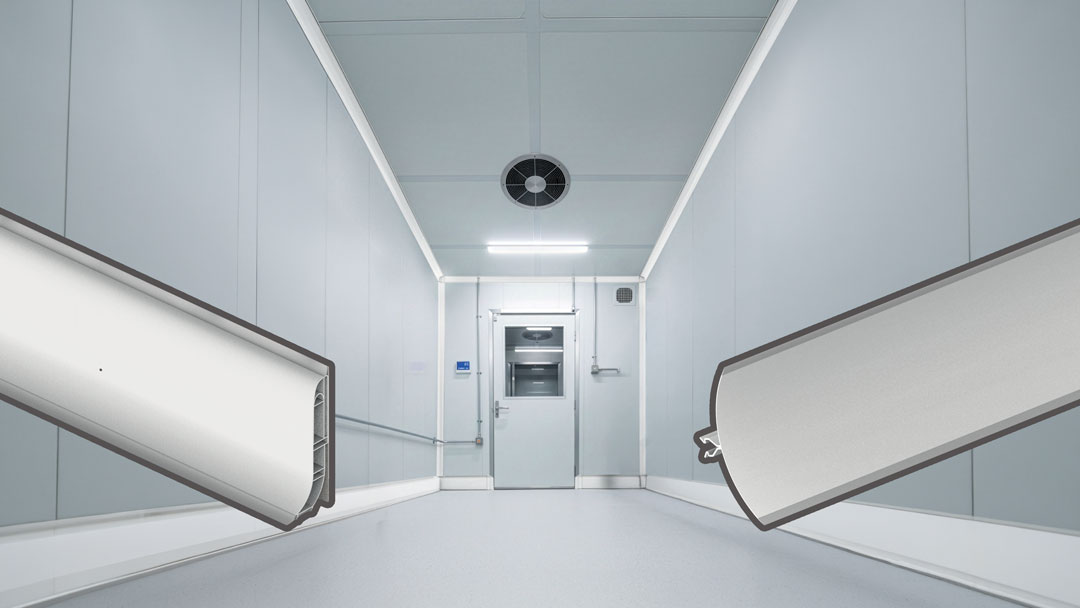
What seals a floor-to-wall juncture permanently isn’t silicone — it’s a mechanical profile. Specifically, the CoR Skirt S sanitary cove base uses a flexible sealing lip that locks against the FRP panel and a snap-on cover strip that hides the fixings. The seal is structural, not chemical. It doesn’t depend on adhesive that can fail or silicone that can shrink. In other words, when you walk away from this installation, the seal is doing the work — not the caulk gun.

The result is the kind of finish a health inspector signs off on without a second look: a continuous coved radius from floor to wall, smooth surface, no gaps, no shadow lines for mold to hide in.

What Will You Actually Need to Do This Renovation?

Here’s the realistic shopping and tool list for a typical small walk-in cooler — say an 8 by 10 foot box you’d find in a restaurant, deli, or small grocery.

  • Materials: enough FRP panels to cover your wall area, the right number of CoR Skirt sections to run the perimeter at floor level, pre-formed corner pieces for inside corners, food-grade neutral silicone for the floor joint, and stainless steel fasteners.
  • Tools: a cordless drill, a spirit level, a hacksaw or fine-tooth saw, a utility knife, a tape measure, a pencil, and a caulk gun. Nothing exotic.
  • Time: roughly a single workday for a two-person crew. The FRP installation runs three to four hours. Specifically, the cove base perimeter — including pre-formed corners — takes about a couple of hours after the FRP is up.
  • Skill level: if you’ve installed bathroom wall panels, hung drywall, or done basic finish carpentry, you have what you need. If you haven’t, hiring a local handyman or finish carpenter for the day is the standard middle ground.

What you don’t need: a specialized flooring subcontractor, an epoxy resurfacing crew, a project manager, or a building permit (in most jurisdictions — check yours). The simplicity of this system is its main selling point. We went deeper on this in our piece on how a snap-on cove base system replaces specialized subcontractors.

What Does FDA Food Code 6-201.13 Actually Require?

The federal rule is short. Floor-to-wall junctures in food facilities must be coved with a minimum 3/8-inch radius. The juncture must also be smooth, durable, and easily cleanable. That’s it.

The CoR Skirt profile exceeds that 3/8-inch minimum radius by a wide margin. It’s smooth (rigid PVC, non-porous). It’s durable (stable from -4°F to 140°F, resistant to standard cleaning chemicals). And it’s easily cleanable (no shadow lines, no porous joints, no mortar). Therefore, when an inspector looks at a properly installed CoR Skirt run, all four boxes check.

State codes track the federal baseline closely. For example, in Texas, TFER §228.173 applies the same coving requirement and adds tolerance limits on gaps between the cove base and the substrate — a detail we cover in our guide to TFER coving requirements and pre-formed corners. In California, Florida, and most other states, the language is similar enough that meeting the federal standard satisfies the state version.

One important note about how compliance actually works at inspection. The FDA does not “approve” specific products. It sets performance requirements, and the local inspector decides whether your installation meets them. Consequently, what you want is a profile that’s compliant by design — meaning the radius, the material, and the surface finish all check out the moment the inspector looks at them. No paperwork, no certifications to produce. It just looks right because it is right.

How Does This Compare to Epoxy Resurfacing or Full Replacement?

You’ve probably already received quotes for the other two paths. Here’s how they actually stack up against an FRP-and-cove-base renovation.

Epoxy resurfacing is what most flooring contractors will quote first. They grind the existing surface, apply primer, pour an epoxy floor that ramps up into a cove at the wall, and let it cure. The technical result is fine. The practical reality is rough. Epoxy systems require curing windows that lock the cooler out of service for one to three days, sometimes more. For a small operator, every day of cooler downtime is lost food, lost prep time, and potentially lost service. We laid out the full comparison in epoxy cove base curing time versus PVC. Furthermore, epoxy is a specialized trade — you can’t do it yourself, and the crew rate is what you’d expect from specialty trades.

Full cooler replacement is what some contractors quote when they don’t want to bother with the smaller renovation job. They’ll tell you the cooler is “too far gone” and recommend a complete swap. Sometimes that’s true. Often it isn’t. A new walk-in cooler runs into many thousands of dollars before installation, plus demolition of the old unit, plus disposal, plus installation, plus the same FRP-and-cove-base interior finishing you’d be doing anyway. As a result, replacement makes sense only when the box itself is structurally compromised — not when the inside just looks bad.

FRP plus rigid PVC cove base sits well below either of those alternatives in both cost and downtime. You pay for the materials, you pay for a day of labor (your own or a handyman’s), and you’re back in service the same evening. We compared the long-term economics of these systems in our piece on total cost of ownership and callback frequency — the numbers favor the simpler system over time, not just upfront.

What Are the Mistakes That Cause Renovations to Fail Inspection?

Three mistakes account for most of the failed re-inspections we hear about. Knowing them in advance is the difference between passing the next visit and starting over.

Mistake one: gaps at the corners. Hand-cut miters almost never close perfectly. Even a small gap — a sixteenth of an inch — is enough for an inspector to flag the juncture. The fix is to use pre-formed inside and outside corners. They’re injection-molded to the right radius and snap together with the straight runs. No gap, no improvisation. This single decision is what separates a renovation that passes from one that doesn’t. The same problem affects rubber baseboards installed by hand, which we documented in rigid PVC versus rubber cove base failures.

Mistake two: silicone as the main seal. A thin bead of food-grade neutral silicone at the floor joint is fine — it’s a finishing detail, it adds a layer of moisture protection, and the manufacturer recommends it. However, the silicone is not what’s holding the seal. The profile is. If your installation strategy is “lots of silicone everywhere,” you’re back in the failure cycle within a year or two. The mechanical profile must do the structural sealing. The silicone is just the cherry on top.

Mistake three: skipping the substrate check. The wall behind your new FRP needs to be sound, dry, and reasonably flat. If the existing insulated panel is delaminated, holding moisture, or visibly damaged, no amount of fresh FRP and cove base will save the renovation. The new finish will mask the problem for a few months and then start failing again. In contrast, a five-minute substrate check before you start saves you from re-doing the whole job. Press on the panel. Look for rust at fasteners. Smell for mildew. If any of those are off, address the substrate first.

Should You Replace the Old Baseboard or the Old Cove?

Many small operators inherit a cooler with whatever the previous owner installed — sometimes a cheap rubber baseboard, sometimes a peel-and-stick vinyl base, sometimes nothing at all (just silicone). None of these were designed for the conditions inside a walk-in cooler. Therefore, they fail predictably, and they fail in ways the health inspector recognizes immediately.

Replacing them with a rigid PVC sanitary cove base is the most common renovation we see. The old material comes off easily — usually in pieces, since the adhesive has already lost its grip. After that, the new profile installs directly onto the wall behind it. The wall doesn’t need to be perfectly clean, just flat and sound.

One word of advice on terminology, because it matters when you’re talking to inspectors and contractors. The food code doesn’t care that you “replaced the baseboard.” The food code cares that the floor-to-wall juncture meets the radius requirement, seals against moisture, and is easily cleanable. Calling it a “baseboard” is fine in casual conversation. Calling it a “rigid PVC sanitary cove base” is what you write on the permit application and the spec sheet. We expanded on this distinction in food facility coving requirements and peel-and-stick base failures.

Get the Renovation Done Right — With Help, Not Hassle

If your walk-in cooler still cools but the inside has run out of road, the FRP-plus-cove-base renovation is the simplest, fastest, and most inspection-friendly path forward. You can do it yourself with basic tools. You can hire a local handyman to do it with you. Either way, the system is designed so the seal does the work — not the silicone, not the adhesive, not your weekend.

If you’d rather talk to someone who actually knows this stuff before you order anything, we’re easy to reach: